Friday, March 29, 2019

Geocoding and Reverse Geocoding with Python

Disclaimer: I originally submitted this article to DataCamp on "Jan 27, 2018". Since they didn't publish it on the platform, I have decided to do it here so that someone out there will find it useful.

Download the original files in HTML and Jupyter Notebook formats

DataCamp Tutorial - Geocoding and Reverse Geocoding with Python

The increasing use of location-aware data and technologies that are able to give directions relative to location and access geographically aware data has given rise to category of data scientists with strong knowledge of geospatial data - Geo-data Scientists.
In this tutorial, you will discover how to use PYTHON to carry out geocoding task. Specifically, you will learn to use GeoPy, Pandas and Folium PYTHON libraries to complete geocoding tasks. Because this is a geocoding tutorial, the article will cover more of GeoPy than Pandas. If you are not familiar with Pandas, you should definitely consider studying the Pandas Tutorial by Karlijn Willems so also this Pandas cheat sheet will be handy to your learning.

Tutorial Overview

  • What is Geocoding?
  • Geocoding with Python
  • Putting it all together – Bulk Geocoding
  • Accuracy of the Result
  • Mapping Geocoding Result
  • Conclusion

What is Geocoding?

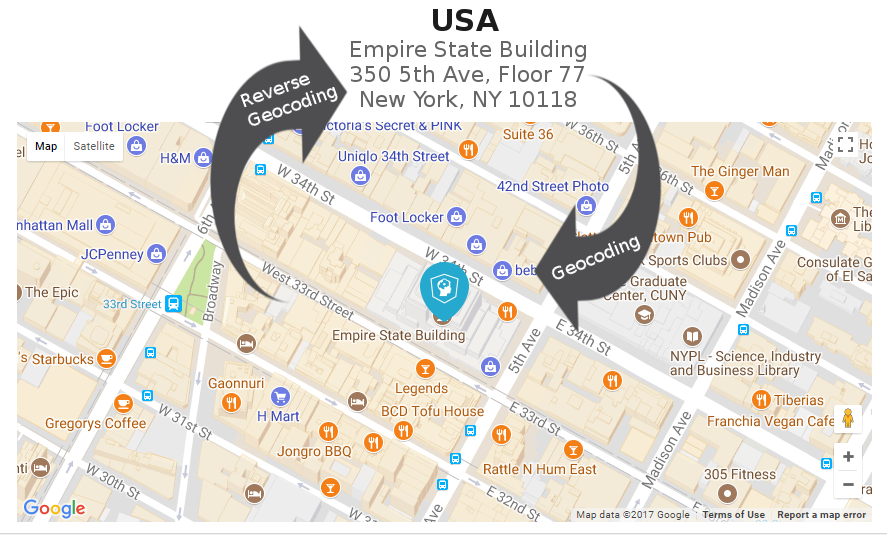
A very common task faced by Geo-data Scientist is the conversion of physical human-readable addresses of places into latitude and longitude geographical coordinates. This process is known as “Geocoding” while the reverse case (that is converting latitude and longitude coordinates into physical addresses) is known as “Reverse Geocoding”. To clarify this explanation, here is an example using the datacamp USA office address:-
Geocoding: is converting an address like “Empire State Building 350 5th Ave, Floor 77 New York, NY 10118” to “latitude 40.7484284, longitude -73.9856546”.

Reverse Geocoding: is converting “latitude 40.7484284, longitude -73.9856546” to address “Empire State Building 350 5th Ave, Floor 77 New York, NY 10118”.
Now that you have seen how to do forward and reverse geocoding manually, let’s see how it can be done programmatically in PYTHON on larger dataset by calling some APIs.

Monday, March 25, 2019

Amazon EC2 - Using SFTP to download or upload files

In this post you will learn how to upload/download files to/from Amazon EC2 Instance using FileZilla and SFTP.

SFTP stands for: Secure Shell (SSH) File Transfer Protocol or Secure File Transfer Protocol.


Step 1:
The very first step is to download your AWS console key file in .pem and convert it to .ppk file.

The key file you download from AWS console will be a .pem file and filezilla doesn't read such a file. So you need to convert it to .ppk file. You can use PuttyGen (puttygen.exe) for this conversion from .pem to .ppk.


Step 2:
Download and install FileZilla client from here Download FileZilla.


Step 3:
Now, launch FileZilla and add your .ppk key file of your AWS instance for public key authentication as follow;

~ Go to Edit >> Settings


~ On the Settings dialog box, under 'Connection', select 'SFTP' then click on 'Add Key File...'. Navigate to where you saved your converted .ppk key file and upload it. Then click on 'Ok' button.


Step 4:
Lets login to the server. Go to File >> Site Manager


Step 5:
Click on 'New Site' button, under 'General' tab select 'SFTP' as the protocol and insert your instance username and password. Finally click on "Connect" button.


Host name is something like: ec2-21-xx-xx-xxx.compute-1.amazonaws.com
Username is: ec2-user
Password is optional.

You should now be connected as seen on the status...


Step 6:
You can now navigate your local site folders on the right side pane and upload to the remote site folder on the left pane. Similarly for the downloading of files.

Note: the files which are owned by root cannot be uploaded and downloaded. You will get permission denied error when you try to download a file owned by root.


So, if you want to download those files, you will use PuTTY to SSH into the machine and change the owner of that file to the normal user using the following command.

sudo chown user:user /folder/file

Replace "user:user" with the appropriate root user name.


That is it!
I hope you find it useful.

Monday, January 14, 2019

Python Programming for GIS Data Processing in QGIS

Python is a general purpose programming language that has a strong presence in the GIS industry as many house hold software such as ArcGIS and QGIS do expose their interfaces through python scripting.

Broadly speaking, python can be used for any of the following:-
1~ Scripting and Automation
2~ Web Development
3~ Data Science — including Machine Learning, Deep Learning, Data Analysis, and Data Visualization
4~ Embedded Applications - Hardware Programming
5~ Gaming
6~ Desktop Applications
7~ Network Programming

Here our focus will be to use python to automate GIS processes via well packaged video series as seen below. Python is excellent tool for doing GIS data wrangling, data manipulation and analysis processes. That is exactly what I set out to teach you in this video series.... By the end of the tutorial, you should be able to use python to:-

  • Extend the capabilities of mapping applications
  • Build a GIS workflow
  • Automate redundant tasks
  • Integrate maps or spatial data into other applications
  • Build your own applications

Let's get our hand dirty manipulating GIS data with python starting with the basics off cause 😊.

Video 1: Getting Started Setting up working environment


Video 2: Writing and executing code


Video 3: How to Install Third-party Python Modules in QGIS 3.x


Video 4: Python Implementations, Comment, Variable, Interactive Help


Video 5: Python Data Types - Part 1


Video 6: Python Data Types - Part 2


Video 7: Python Data Types - Part 3


Coming soon...


Saturday, January 12, 2019

How to Prepare A Site Plan

Before we see "How to a Site Plan can be Prepared", here is a little background to what it is.

Who is a Land Surveyor?
A land surveyor is person who is trained and licensed by a regulatory body to practice legal survey profession in a state. This person will be under the supervision of the state's surveyor general or the director/commissioner of surveys for that state.

One important document produced by land surveyors is the site plan (also called survey plan or professional survey or boundary survey or lot description or final survey or parcel demarcation etc).


What is a Site Plan?
A Site Plan is a graphical description of a parcel of land that is attached to the application of Right of Occupancy (RofO) or Certificate of Occupancy (CofO) over a landed property. It is a necessary legal document required by the authority to approve the development of a land parcel. It is a document that measures the boundary of a parcel of land. It gives an accurate measurement, description of the piece of land.


Information to be Shown on a Site Plan
A professional site plan drawn to scale should show the entire property (including all property lines) with the existing and proposed structures. Other information that must be shown include:
~ the name of the owner of the land surveyed
~ the address or description
~ the size and the drawn-out portion as mapped out on the survey plan document
~ the beacon numbers
~ the name of the Surveyor who drew up the survey plan
~ the date it was drawn and a stamp showing that the land is either free from government acquisition or not
~ the directional arrow (aka North Arrow)
~ the Scale at which the plan was drawn
~ the coordinates system used
~ the reference control beacons used

Why is a Site Plan Required?
The primary reason why a site plan is required is to get what is known as a "Land Information". Before a transaction is consummated over a plot of land, it is always advisable to prepare the site plan presented for the land to basically find out whether it falls under government acquisition or not and as well authenticate the claim of ownership to the land.
In the case of a new construction, building additions, substantial accessory structures, and parking must be submitted on a professional stamped survey. Land authorities will make the final determination whether your project met the requirements to be implemented on that land.

Can I Draw the Site Plan Myself?
Yes, if you have the skills to do it. However, if the purpose of the plan is for legal documentation a registered surveyor most endorses your work to be considered by any authority.

How to Prepare A Site Plan

You don’t have to be a genius to prepare a site plan, but you do have to be able to work with the tools that helps you collect data from site and draw them on a paper.

Basically, there are two phases to producing a site plan namely:-

Phase 1: Site work
Here is where the surveyor goes to the field for the purpose of data collection. Depending on the purpose and the accuracy of the survey plan, different kind of instruments are used for the site data collection. These instruments include:-
a) Chain instrument
b) Compass
c) Theodolite
d) Total station
e) GPS

Whatever the instrument used, you will collect data such as distance, bearings and coordinates that will be used to draw the survey plan in the next phase.

Phase 2: Office Work
This is where you do the actual drawing of the survey plan. There are different kind of instruments used for plotting/charting survey plan, however the most commonly use software is the AutoCAD drafting software.

Learn to draw/plot survey plans using a FREE software similar to AutoCAD from here.

Thank you for reading.
Saturday, December 22, 2018

Install Third-party Python Modules in QGIS 3.x on Windows 10 platform

Here is how you can install third-party Python Modules in QGIS 3.x on Windows 10 platform. First let's see one very important module that is not installed with python setup that comes with QGIS. This module we will look at is "Pandas".

If you launch QGIS Python Console, and import 'pandas', you will get error


Steps to solving the problem

Step 1: Search for "OSGeo4W Shell"


Step 2: Right click on it and select "Run a s Administrator"


Step 3: Ensure you can run pip from the command line. You may encounter error that says: No module named pip

In my case I ran python -m ensurepip --default-pip to get pip working. You can learn more from the link above. The "-m" flag import the pip module or package and then run as a script (it ensures that module is ran as script on cmd).


Note: If you want to switch the shell from python 2.7 to python 3.x, simply enter this command: py3_env. I will advice you do that because that is what the QGIS 3.x python console is using by default. So, just enter py3_env to switch to python 3 shell, then install your third-party modules there.


Step 4: Run: python -m pip install pandas to get pandas module installed as seen above.
Now you can import and use pandas in QGIS Python Console for further data manipulation without any error as seen below. The "-m" flag import the pip module or package and then run as a script.


That is it!


A video explanation of the steps above is here below:-

Tuesday, December 11, 2018

How to save High Resolution Image from Google Earth Pro

I have seen many "Google Earth Pro" users taking screenshots of the images instead of saving it directly in high resolution, probably because the "Save Image" function is a little bit obscured. This post will guide you through saving a high resolution image from "Google Earth Pro" released in the year 2018.


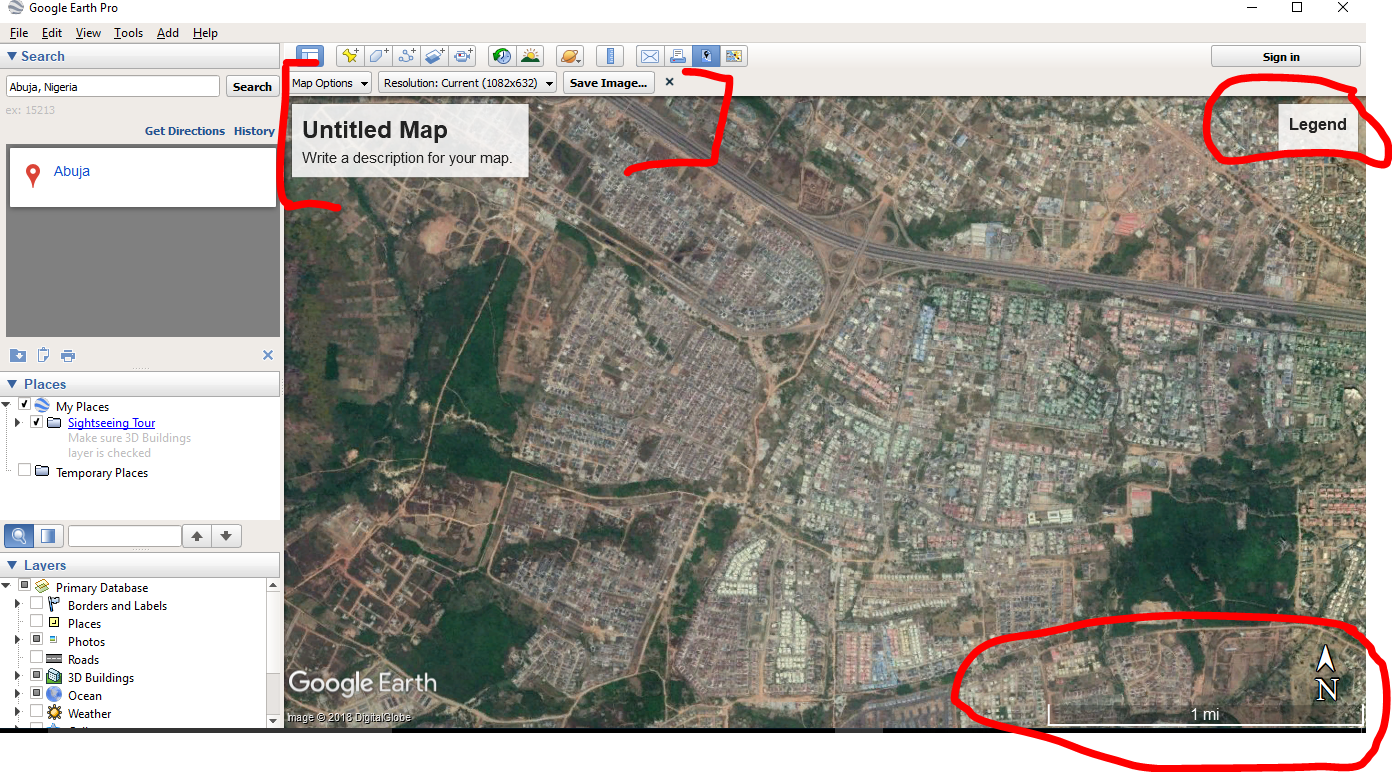
At first when you click on the save button, nothing seems to happen aside the "Untitled Map", "Compass", "Scale" and empty "Legend" boxes that pop-up on the screen.


If you look closely, just under the "Untitled Map" box, there appear the "Save Image" tool bar. On that very tool bar, you will see the "Save Image" button. That is the button you actually needed to save the image.


But before you save your image, you will definitely like to update the map title and do other settings. This can be done from the "Map Options" button on the "Save Image" tool bar.


You could also select your preferred image resolution from the tool bar.

Thank you for reading.

Tuesday, December 4, 2018

An Atlas Map of Nigerian States - QGIS Map Report Tutorial

QGIS 3 comes with a nice feature for creating collection of maps (aka Atlas). This feature is called "Report" in QGIS 3, it works closely like the "Print Layout" (formerly know as "Print Composer" in QGIS 2).

You can access the "Report" window from the project menu as seen below...


In the next few lines, I will demonstrate how to generate a map report in QGIS using the Map of Nigerian States. See the document we want to produce at the end of this tutorial here...


Saturday, December 1, 2018

The Difference between the United Kingdom, Great Britain and England

Often people confuse these three: United Kingdom, Great Britain and England. As an example, in sports different names are used for Olympic games different from football World Cup game and many others.

Below is the map of the world and the area in question is this tiny mass of land within the red mark.


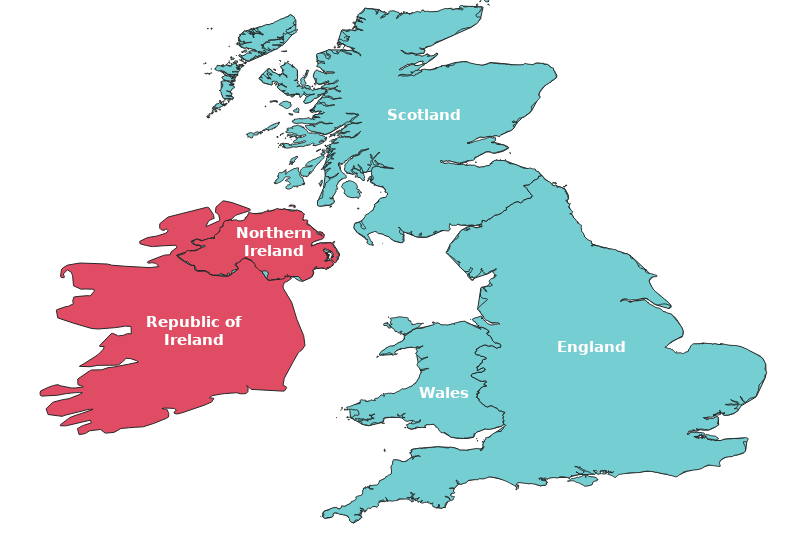
Lets zoom in and look at the map closer, the whole of that area is the "British Isles" consisting of five countries which is categorized into to named: Ireland and Great Britain.

Ireland consist of two countries "Republic of Ireland and Northern Ireland", while Great Britain consist of three countries "England, Scotland and Wales".

United Kingdom is made up off the whole of Great Britain and part of Ireland. That is all the countries in Great Britain ("England, Scotland and Wales") are in United Kingdom and in Ireland only Northern Ireland is part, Republic of Ireland isn't part of United Kingdom.

Hmm! This sounds complicated, right? Let clarify this by visualizing it on a map.


British Isles = Ireland + Great Britain

Here purple color for Ireland and blue color for Great Britain to clearly see to two different regions.


Ireland = "Republic of Ireland + Northern Ireland"
Great Britain = "England + Scotland + Wales"


United Kingdom =  "England + Scotland + Wales + Northern Ireland"


I hope that was clear and succinct.
Thank you for reading

Wednesday, November 14, 2018

Drawing Site Plan with DraftSight a FREE Alternative to AutoCAD

There are many low budget or free Computer-Aided Design (CAD) software alternatives to Autodesk's AutoCAD out there and DraftSight is one of the best alternatives I have used.


Using the free version, you could plot or draw a professional survey plan just as you would do in AutoCAD. In this blog post, I will demonstrate how you will do just that using the free DraftSight CAD software. So, download the DraftSight here and follow the instructions below to activate it.

Instruction 1: Download the software from the link above and launch it to install


Instruction 2: Select Free option and click the next button as seen above.

Instruction 3: Accept the terms in the license agreement and install


Tuesday, November 13, 2018

The difference between "Geocoding" and "Geolocation"

These two terms are often confused by users in of spatial data. Here is a quick explanation to help clarify the difference between the two. Both of these terms are consistently been misuse by people within the geospatial community.

Address: "Abuja International Conference Centre, Herbert Macaulay Way, Abuja, Nigeria"
Coordinates (in 3D): "Latitude: 9.0438014, Longitude: 7.4919024, Sea level: 503m"


Looking at the landmark address above and its corresponding coordinates in three-dimension (3D), we could say:-

Geocoding - means to 'Convert addresses to geographic coordinates, or the reverse'. While  Geolocation - means to 'Return the precise location of a device based on Wi-Fi or cell towers'.

More elaburate explanation from Wikipedia, the free encyclopedia:-

Geocoding is the computational process of transforming a physical address description to a location on the Earth's surface (spatial representation in numerical coordinates). Reverse geocoding, on the other hand, converts geographic coordinates to a description of a location, usually the name of a place or an addressable location. Geocoding relies on a computer representation of address points, the street / road network, together with postal and administrative boundaries.

Geolocation is the identification or estimation of the real-world geographic location of an object, such as a radar source, mobile phone, or Internet-connected computer terminal. In its simplest form geolocation involves the generation of a set of geographic coordinates and is closely related to the use of positioning systems, but its usefulness is enhanced by the use of these coordinates to determine a meaningful location, such as a street address.