QGIS 3 comes with a nice feature for creating collection of maps (aka Atlas). This feature is called "Report" in QGIS 3, it works closely like the "Print Layout" (formerly know as "Print Composer" in QGIS 2).
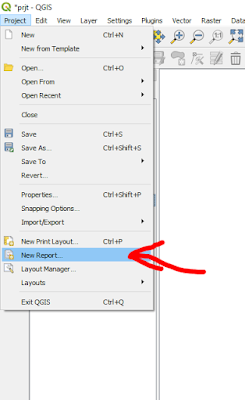
You can access the "Report" window from the project menu as seen below...
In the next few lines, I will demonstrate how to generate a map report in QGIS using the Map of Nigerian States. See the document we want to produce at the end of this tutorial here...

Step 1: Load your data layer as usual. Here in this case, I loaded the administrative shapefile layer of Nigerian state. Then style it the way you would like it to appear in your report.

Step 2: Go to the "Project" menu and select "New Report". Title the report with whatever name you want and click on OK button.

Step 3: You should now have a blank report you can start editing. Lets add a "Header and Footer" to the report. Select the respective buttons and click the edit buttons to add text and images to your report "Header and Footer".
The "Header and Footer" are the first and last pages of the report respectively.

Step 4: For the "Header", I added two text labels as seen below. While for the "Footer", I added a single text label that says: "Thank You", just to keep it simple but you can pretty much do whatever you want here.


Step 5: Now we have our First and Last pages ready. Lets add our maps in between them...

Step 6: Now click on the "+" sign and select "Static Layout Section" to add a static map just as the name implies. The static map will be the complete map showing all the states.

Step 7: Next, select the Report layer from the "Report Organizer" then click on the "+" sign again and select "Field Group Section" to add a dynamic map that will be generated based on selected layer and attribute field. This will make the static map above on the same level as this dynamic map (this could easily get complicated if you want to nest report based on certain conditions)

Select the appropriate Layer and Field to map dynamically by editing the "Field Group Section" body. Adjust the scale to fit the level of details you want to show.
Step 8: Then make sure you select "Controled By Report" on the Properties on Left panel.

Step 9: Let add a dynamic label to the map, so it displays the name of each state on top of each map page. Select the "Text Label" button and add it to the top. To make it dynamic, on its item properties panel click on "Insert an expression" and select the field you want to label the map with under "Field and Value".

Then format the label appropriately to make it look good.

Step 10: You could do a whole lot of customization, but we will keep it simple here and click on "Export Report as PDF" from the toolbar or from the Report menu.

This will generate an atlas like document where each attribute in the selected layer will be a map on a single page.

The final map product can be seen here...
It is as easy as you can see. Over 30 pages collection of unique maps generated on the fly.
That is it.
I hope you like the tutorial.
Share and Enjoy!
You can access the "Report" window from the project menu as seen below...

In the next few lines, I will demonstrate how to generate a map report in QGIS using the Map of Nigerian States. See the document we want to produce at the end of this tutorial here...
Step 1: Load your data layer as usual. Here in this case, I loaded the administrative shapefile layer of Nigerian state. Then style it the way you would like it to appear in your report.

Step 2: Go to the "Project" menu and select "New Report". Title the report with whatever name you want and click on OK button.

Step 3: You should now have a blank report you can start editing. Lets add a "Header and Footer" to the report. Select the respective buttons and click the edit buttons to add text and images to your report "Header and Footer".
The "Header and Footer" are the first and last pages of the report respectively.

Step 4: For the "Header", I added two text labels as seen below. While for the "Footer", I added a single text label that says: "Thank You", just to keep it simple but you can pretty much do whatever you want here.


Step 5: Now we have our First and Last pages ready. Lets add our maps in between them...

Step 6: Now click on the "+" sign and select "Static Layout Section" to add a static map just as the name implies. The static map will be the complete map showing all the states.

Step 7: Next, select the Report layer from the "Report Organizer" then click on the "+" sign again and select "Field Group Section" to add a dynamic map that will be generated based on selected layer and attribute field. This will make the static map above on the same level as this dynamic map (this could easily get complicated if you want to nest report based on certain conditions)

Select the appropriate Layer and Field to map dynamically by editing the "Field Group Section" body. Adjust the scale to fit the level of details you want to show.
Step 8: Then make sure you select "Controled By Report" on the Properties on Left panel.

Step 9: Let add a dynamic label to the map, so it displays the name of each state on top of each map page. Select the "Text Label" button and add it to the top. To make it dynamic, on its item properties panel click on "Insert an expression" and select the field you want to label the map with under "Field and Value".

Then format the label appropriately to make it look good.

Step 10: You could do a whole lot of customization, but we will keep it simple here and click on "Export Report as PDF" from the toolbar or from the Report menu.

The final map product can be seen here...
It is as easy as you can see. Over 30 pages collection of unique maps generated on the fly.
That is it.
I hope you like the tutorial.
Share and Enjoy!
No comments:
Post a Comment